
今天 (2019 年 03 月 18 日) 在 CSDN 上申请到了一个新的专栏 [C/C++ 与算法], 专栏地址:
http:// https://blog.csdn.net/wy_bk/column/info/35449
算法之于程序, 犹如数学之于世界, 亦如艺术之于灵魂. 假如没有算法, 代码就不会变得精妙和美丽, 世界也将因缺少智慧的光芒而暗淡无色.
更新这个专栏的过程也是一个自我学习的过程, 希望在这里我们能共同讨论, 学习, 进步 >_<
今天 (2019 年 03 月 18 日) 在 CSDN 上申请到了一个新的专栏 [C/C++ 与算法], 专栏地址:
http:// https://blog.csdn.net/wy_bk/column/info/35449
算法之于程序, 犹如数学之于世界, 亦如艺术之于灵魂. 假如没有算法, 代码就不会变得精妙和美丽, 世界也将因缺少智慧的光芒而暗淡无色.
更新这个专栏的过程也是一个自我学习的过程, 希望在这里我们能共同讨论, 学习, 进步 >_<
在汇编层面上, 递归可以看作是两个循环, 每个循环的循环参数都由另一个循环传入
递归是基于分治的, 也就是”分而治之”. 当需要求解的问题的输入规模为 N, 而 N 又很大的时候, 直接按照线性过程求解将十分困难. 这个时候, 如果 N 具有某些特性, 能够被分解成更小规模的问题 n, 并且这些小规模的问题 n 满足以下条件:
在高级语言中, 递归的表现形式就是一个函数直接或间接地调用了自己, 直到满足出口条件, 结束递归.
“递归”分开就是”递”和”归”, “递”是离开自己, “归”是回到自己. 中文中的”递归”一词也表明了递归函数是一个来回往复的运算过程. 在英文中, “递归”的英文是”recursion”, “recursion”包含”重复”的意思. 另外, “递归”与”循环”在语义上也有明显的区别, “递归 (recursion)”是一个一维的往复结构, 而”循环 (loop)”则是一个二维的环状结构.
斐波那契数列来源于斐波那契在其著作《计算之术》中提出的一个问题:
在第一个月有一对刚出生的小兔子,在第二个月小兔子变成大兔子并开始怀孕,第三个月大兔子会生下一对小兔子,并且以后每个月都会生下一对小兔子。 如果每对兔子都经历这样的出生、成熟、生育的过程,并且兔子永远不死,那么兔子的总数是如何变化的?
斐波那契《计算之术》
对于上面这个问题我们可以得出这样一个过程:
第 01 个月: 01 只小兔子 –> 01
第 02 个月: 01 只大兔子 –> 01
第 03 个月: 01 只大兔子 + 01 只小兔子 –> 02
第 04 个月: 02 只大兔子 + 01 只小兔子 –> 03
第 05 个月: 03 只大兔子 + 02 只小兔子 –> 05
第 06 个月: 05 只大兔子 + 03 只小兔子 –> 08
第 07 个月: 08 只大兔子 + 05 只小兔子 –> 13
…
于是, 我们得到了这样一个数列:
1,1,2,3,5,8,13,21,34…
这就是斐波那契数列 (也叫”兔子数列”).
我们先来借助 for 循环, 使用迭代来计算前 30 位斐波那契数列, 程序如下:
#include<stdio.h>
#include<bits/stdc++.h>
using namespace std;
#define MAX_SIZE 30
int main(){
    int a[MAX_SIZE];
    a[0]=0;
    a[1]=1;
    printf("%d ",a[1]);

    for(int i=2;i<=MAX_SIZE;i++){
        a[i]=a[i-1]+a[i-2];
        printf("%d ",a[i]);
    }
    return 0;
}
运行结果:
1 1 2 3 5 8 13 21 34 55 89 144 233 377 610 987 1597 2584 4181 6765 10946 17711 28657 46368 75025 121393 196418 317811 514229
迭代实现的求解斐波那契数列很好理解, 下面使用递归来实现一下.
下面的程序可以计算斐波那契数列中指定位置的值, 程序如下:
#include<stdio.h>
#include<bits/stdc++.h>

using namespace std;

int f(int n){
    if(n==0){
        return 1;
//斐波那契数列的首位是 1, 因此返回 1
    }else if(n==1){
        return 1;
//斐波那契数列的第 2 位是 1, 因此返回 1

    }else{
        return f(n-1)+f(n-2);
//从斐波那契数列的第 3 位及以后开始都可以使用前面两位的和计算出
    }
}

int main(){
    int a=f(7); //返回斐波那契数列的第 7 个值(从 0 开始计算)
    printf("%d\n",a);
    system("pause");
    return 0;
}
为了搞清楚递归的函数调用过程, 我们对上面的程序设置两个断点, 之后采用”单步进入”的方式逐步观察计算过程, 为了方便说明, 我们将函数 f() 的参数设置为 5, 即:
int a=f(5);
断点设置情况如下:
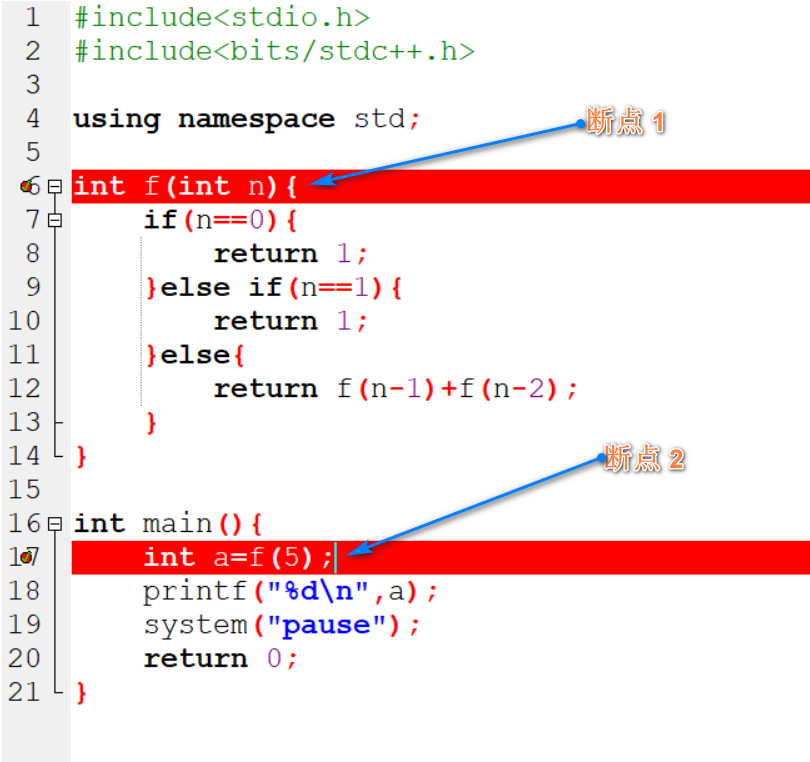
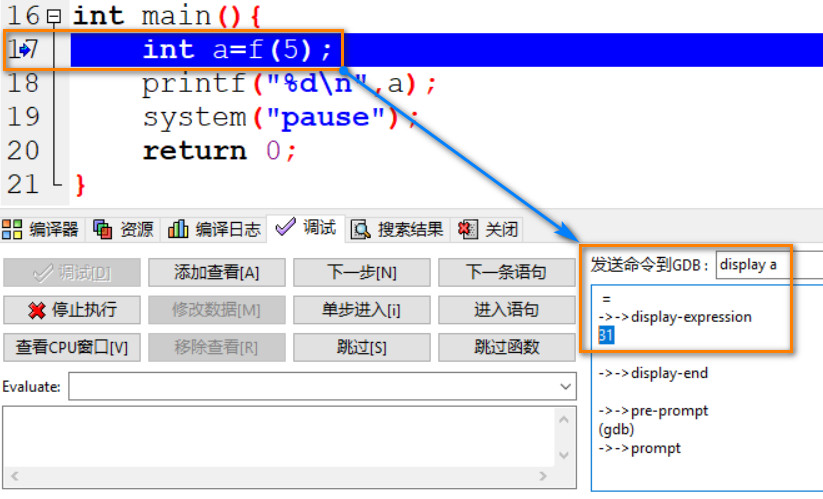
下面开始逐步分析展示本次调试过程:
01: a 为一个随机的初始值 31.
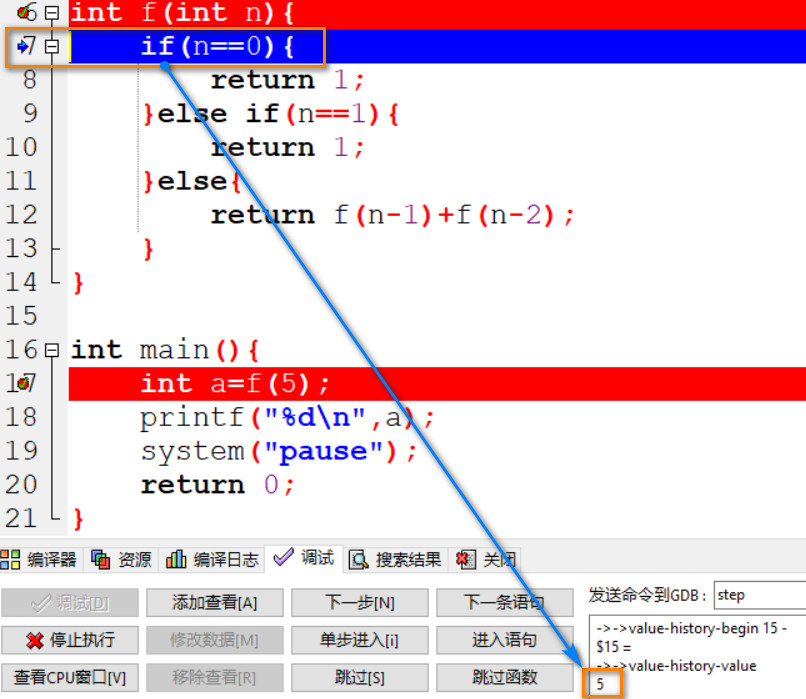
02: 参数 5 被传递给函数 f(n), n=5.
03: n 进入 else if 语句并和 1 对比判断是否相等, 此时 n=5.
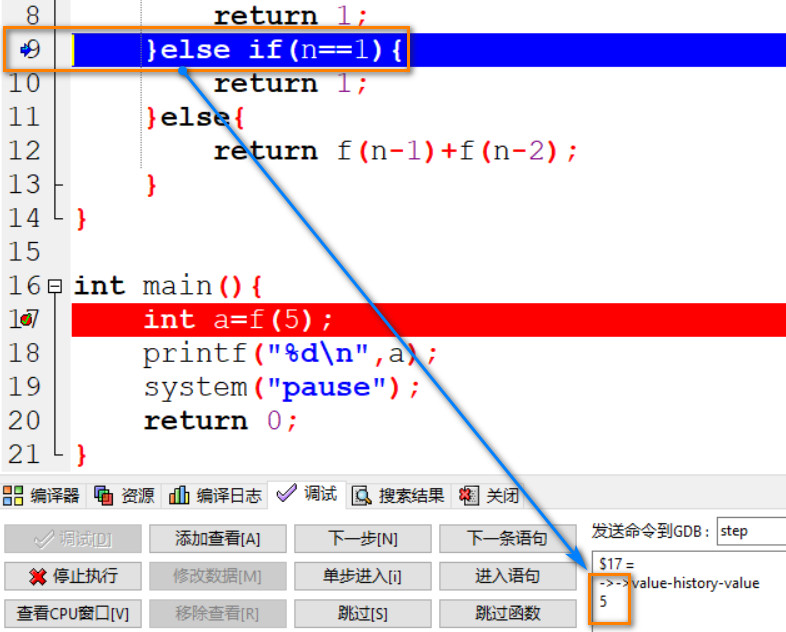
04: 由于 5!=1, n 进入 else 语句, 此时 return f(5-1)+f(5-2);
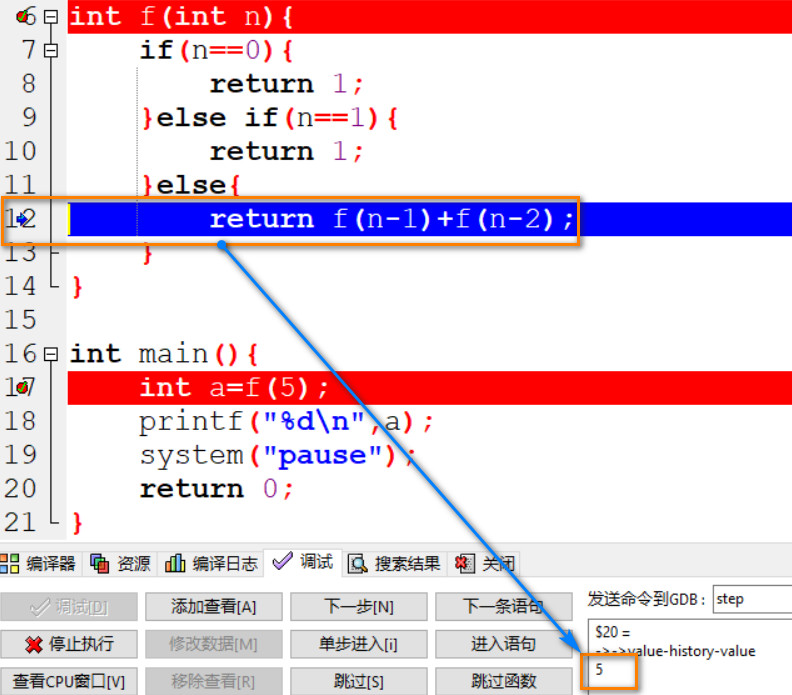
05: 由于不知道上一步需要的 f(4) 和 f(3) 的值, 因此 n-1=4 并重新执行 f(n) 函数, 此时 n=4.
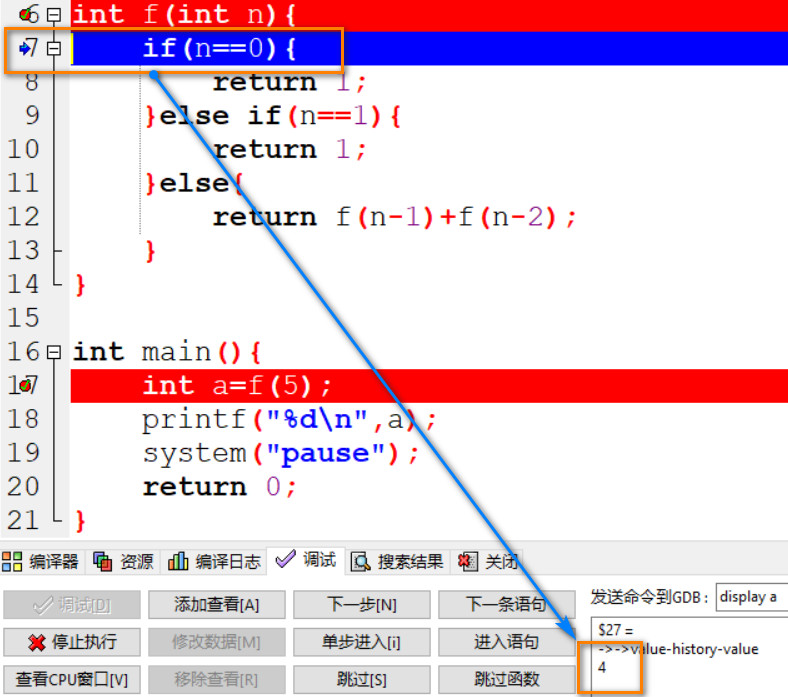
06: n 进入 else if 语句并和 1 对比判断是否相等, 此时 n=4.
07: 由于 4!=1, n 进入 else 语句, 此时 return f(4-1)+f(4-2);
08: 由于不知道上一步需要的 f(3) 和 f(2) 的值, 因此 n-1=3 并重新执行 f(n) 函数, 此时 n=3.
09: n 进入 else if 语句并和 1 对比判断是否相等, 此时 n=3.
10: 由于 3!=1, n 进入 else 语句, 此时 return f(3-1)+f(3-2);
11: 由于不知道上一步需要的 f(2) 和 f(1) 的值, 因此 n-1=2 并重新执行 f(n) 函数, 此时 n=2.
12: n 进入 else if 语句并和 1 对比判断是否相等, 此时 n=2.
13: 由于 2!=1, n 进入 else 语句, 此时 return f(2-1)+f(2-2);
14: 由于不知道上一步需要的 f(1) 和 f(0) 的值, 因此 n-1=1 并重新执行 f(n) 函数, 此时 n=1.
15: n 进入 else if 语句并和 1 对比判断是否相等, 此时 n=1, 由于 1=1 为真, 因此返回 1 并跳出 if 判断语句:
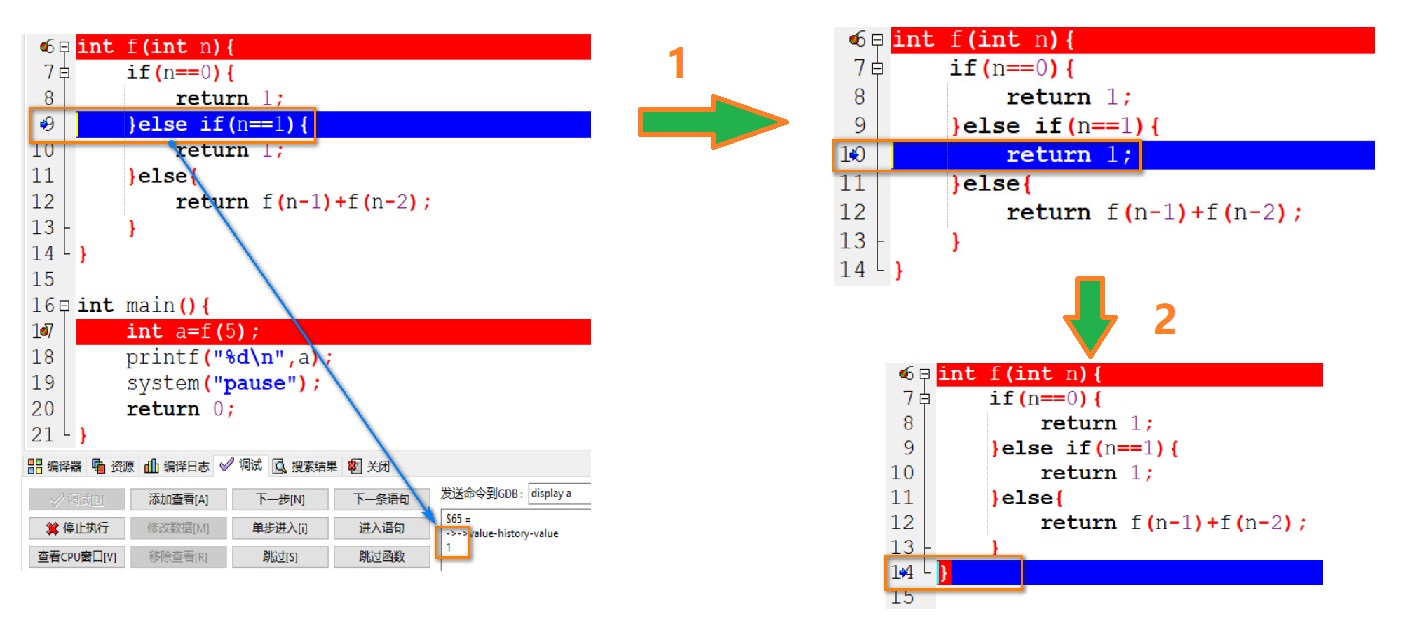
16: 经过上面的步骤知道了 f(1) 的值, 但是还不知道 f(0) 的值, 因此 n-1=1 并重新执行 f(n) 函数, 此时 n=0. 由于 0=0 为真, 因此返回 1, 至此, 边界条件 f(0) 和 f(1) 的值都知道了.
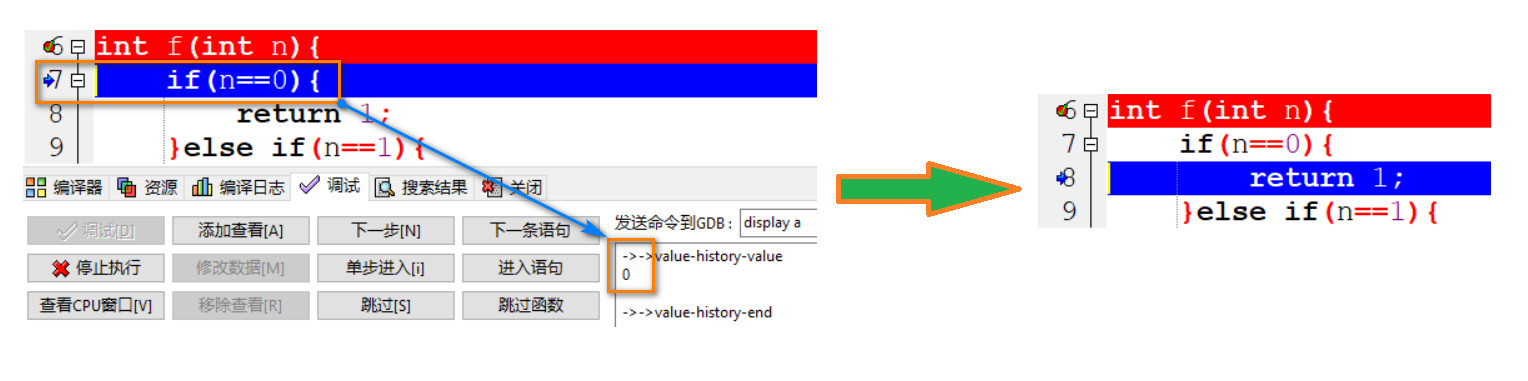
(后续过程不再使用文字描述, 见下面的图片说明.)
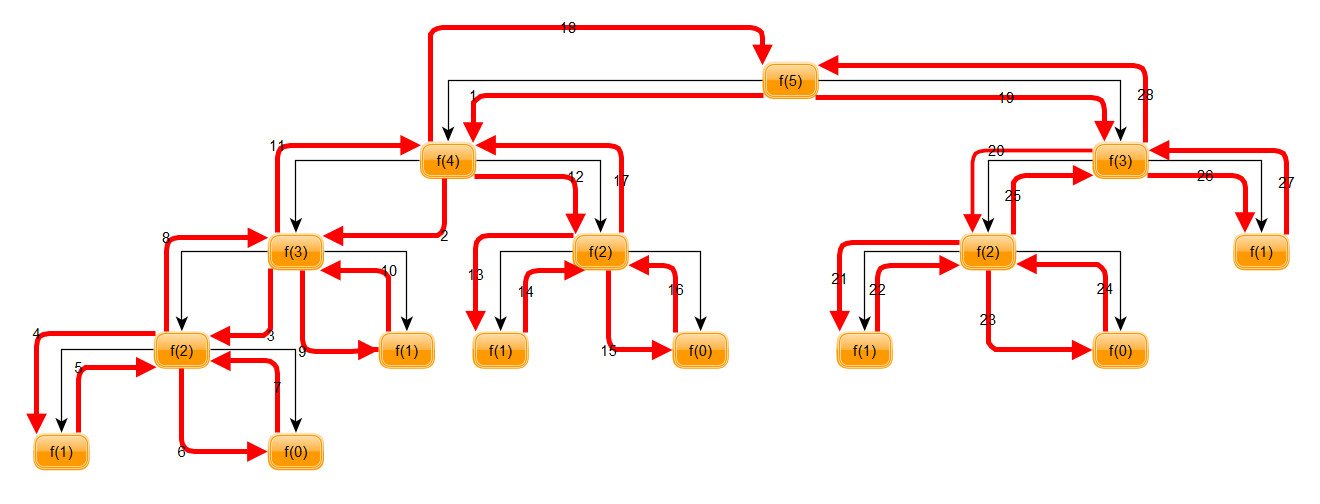
这个过程其实就是一个二叉树的遍历过程, 我用图片的形式绘制了整个过程, 如图 9:
上面这个程序运行一次只能输出斐波那契数列中的一个数值, 下面对该程序进行一个改进, 使得可以输出指定的前 n 位的斐波那契数列, 程序如下:
#include<stdio.h>
#include<bits/stdc++.h>
using namespace std;

int f(int n){
    if(n==0){
        return 1;
    }else if(n==1){
        return 1;
    }else{
        return f(n-1)+f(n-2);
    }
}


int main(){
    int n=5; //设置打印前 6 个斐波那契数列元素
    for(int i=0;i<=n;i++){
        int a=f(i);
        printf("%d ",a);
    }
    system("pause");
    return 0;
}
上述程序的运行结果是:
1 1 2 3 5 8
Wikipedia 上对于汉诺塔问题的说明如下:
The Tower of Hanoi (also called the Tower of Brahma or Lucas’ Tower and sometimes pluralized) is a mathematical game or puzzle. It consists of three rods and a number of disks of different sizes, which can slide onto any rod. The puzzle starts with the disks in a neat stack in ascending order of size on one rod, the smallest at the top, thus making a conical shape.
The objective of the puzzle is to move the entire stack to another rod, obeying the following simple rules:
1. Only one disk can be moved at a time.
2. Each move consists of taking the upper disk from one of the stacks and placing it on top of another stack or on an empty rod.
3. No larger disk may be placed on top of a smaller disk.With 3 disks, the puzzle can be solved in 7 moves. The minimal number of moves required to solve a Tower of Hanoi puzzle is 2n − 1, where n is the number of disks.
Wikipedia, Source: https://en.wikipedia.org/wiki/Tower_of_Hanoi
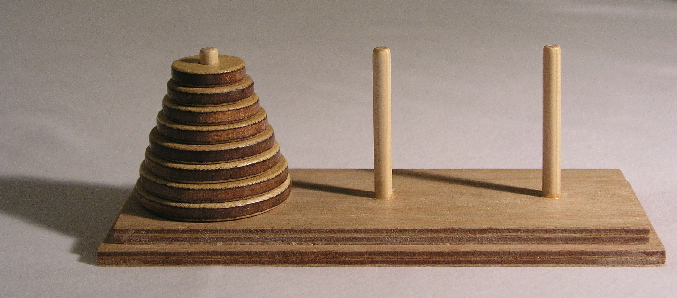
原始的汉诺塔问题是一个来自于印度的数学游戏, 在该游戏中, 有三根柱子, 其中一根柱子上有 64 个圆盘, 且这些圆盘都按照较大的圆盘在较小的圆盘下面的原则放置, 如图 10:
现在要把这些圆盘从目前的柱子上移动到另外两根柱子的其中一根上, 要求如下:
汉诺塔问题十分适合使用递归来解决, 使用”分治”的思想来思考这个问题就能找到解决问题的思路. 我们首先考虑如果这个汉诺塔问题只有两个圆盘时该如何移动圆盘(假设三个柱子从左向右依次为 A, B, C):
通过这三步, 将 B 柱作为一个中转柱, 我们就完成了把 A 上的圆盘全部转移到 C 上任务, 整个过程都符合汉诺塔的游戏规则.
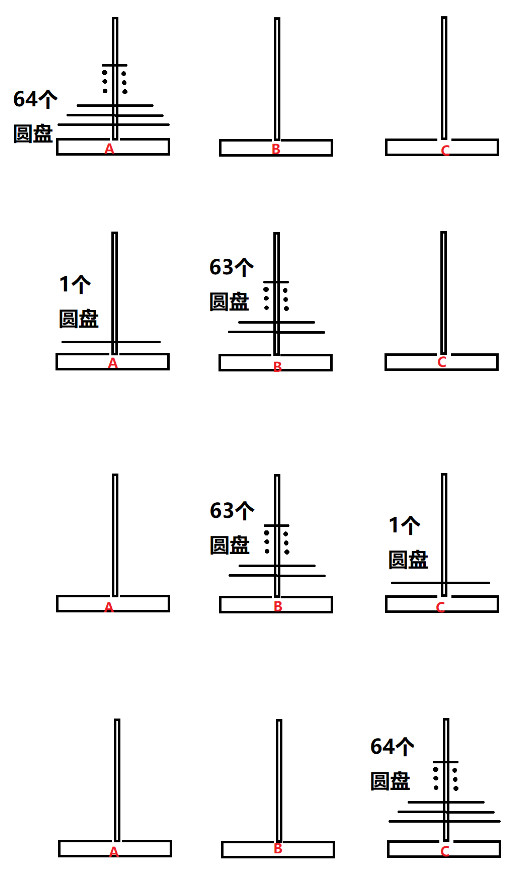
但是, 我们现在有 64 个圆盘, 不是 2 个圆盘, 这该怎么办呢? 我们这时可以用”分治”的思想来想想看. 如图 11, 我们把 A 柱上较小的 63 个圆盘看作一个圆盘, 把下面最大的那个圆盘看作 1 个圆盘, 这样就成了”两个圆盘”, 因此可以使用上面关于只有两个圆盘时的移动方式来解决这个问题, 过程都显示在下面的图片里了:
那么之后该怎么做呢?
当我们把最大的一个圆盘移动到 C 上, 把 63 个较小的圆盘移动到 B 上之后, 即图 11 中的第 3 步, 我们可以发现, 此时圆盘的分布和图 11 中的第 2 步是很相似的, 只不过空出来的柱子由 C 变成了 A, 于是, 就有了下面这个过程:
将多个圆盘看作是一个圆盘与真的是一个圆盘其实是一样的. 下面我们从递归的程序角度思考一下这个过程:
这么移动的工作量是很大的, 移动完全部 64 个圆盘需要大约 1800 亿亿步:
18,446,744,073,709,551,615
根据上面的介绍, 用 C++ 实现的话, 程序是这样的:
#include<iostream>
#include<bits/stdc++.h>
using namespace std;

//假设函数 (int n, char a, char b, char c) 的作用是将 n 个圆盘从 a 移动到 c

void f(int n, char a, char b, char c){
        if(n==1){
            cout<<"将盘子"<<n<<"从"<<a<<"移动到"<<c<<endl;
    //当只有 1 个盘子时, 直接从 a 移动到 c
        }else{
            f(n-1,a,c,b);
    //将 n-1 个圆盘由 a 移动到 b
            cout<<"将盘子"<<n<<"从"<<a<<"移动到"<<c<<endl;
            f(n-1,b,a,c);
    //将 n-1 个圆盘由 b 移动到 c
        }
    }

int main(){
    f(3,'a','b','c');
    return 0;
}
上面这个程序的运行结果如下 (圆盘的序号越大则圆盘越大):
假设有三个圆盘, 移动顺序是这样的:
假设有四个圆盘, 移动顺序是这样的:
最后, 来看几个关于汉诺塔问题的动图吧.
图 12:

图 12 By André Karwath aka Aka – Own work, CC BY-SA 2.5, https://commons.wikimedia.org/w/index.php?curid=85401
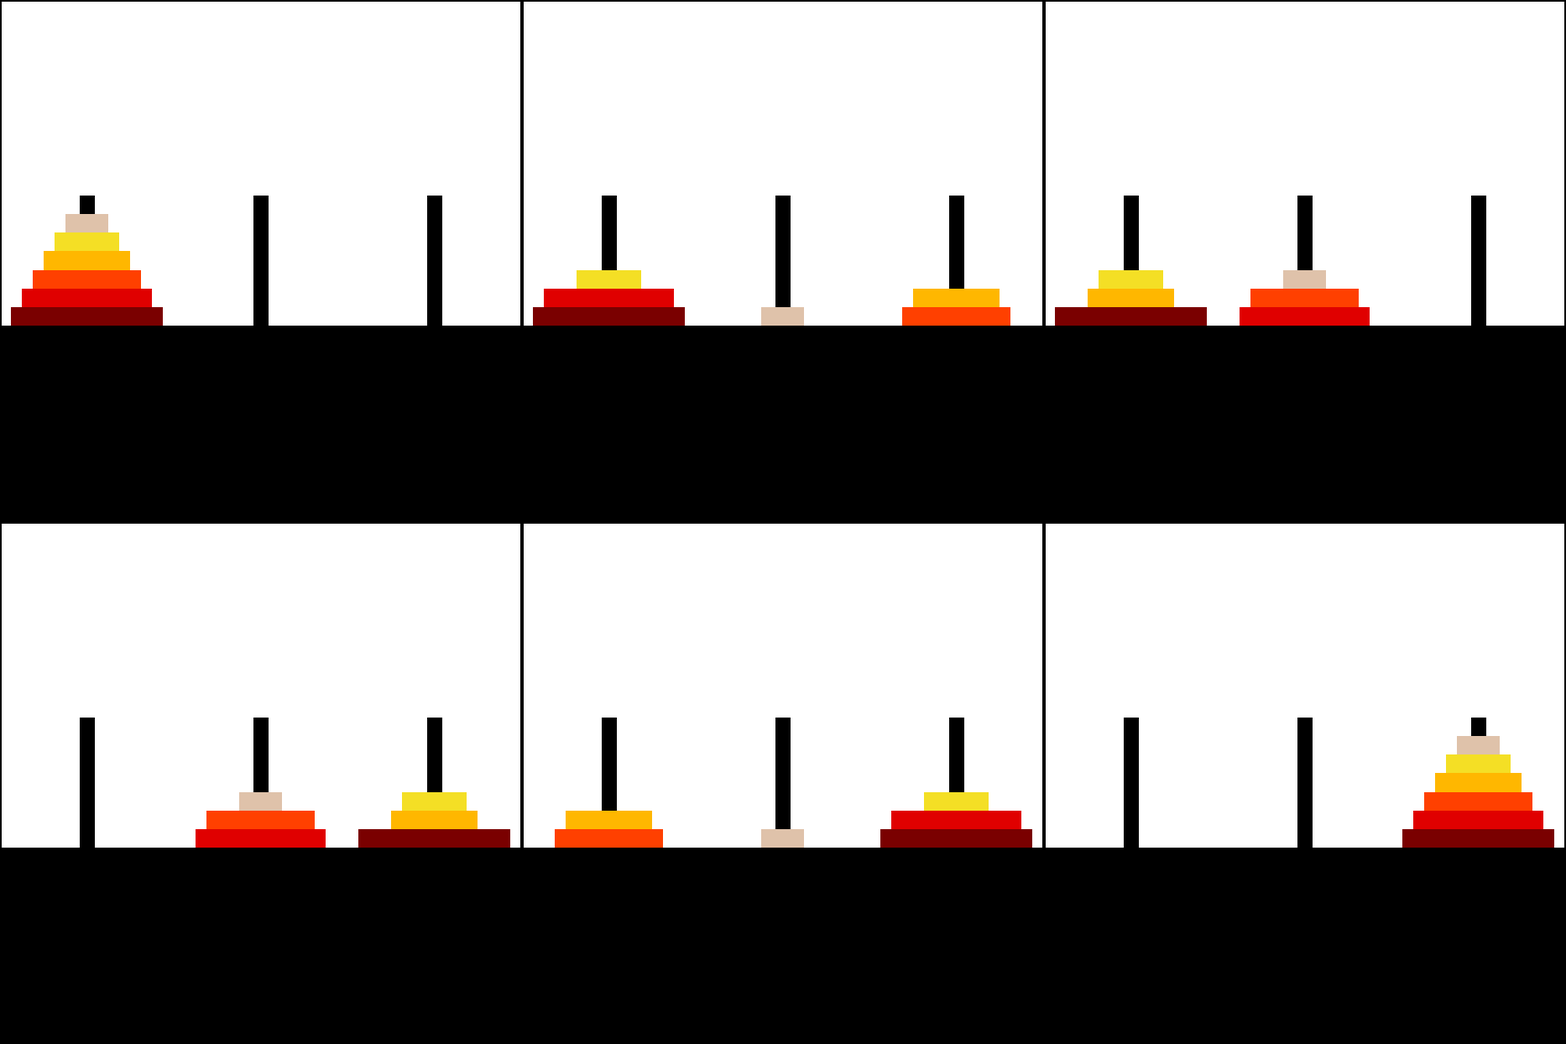
图 13:
操作系统: CentOS 7
PHP 版本: PHP 7
phpMyAdmin 版本: phpMyAdmin-4.8.5-all-languages
Web 服务器: Apache
phpMyAdmin 是一个基于 PHP 环境的运行在 Web 服务器上的 MySQL 数据库管理工具, 借助 phpMyAdmin, 可以在 Web 浏览器上管理 Mysql 数据库.
phpMyAdmin 官网地址: https://www.phpmyadmin.net/
phpMyAdmin 需要借助 Web 服务器运行, 因此首先进入 Web 服务器的网站根目录:
cd /var/www/html/
下载 phpMyAdmin 安装文件:
wget https://files.phpmyadmin.net/phpMyAdmin/4.8.5/phpMyAdmin-4.8.5-all-languages.zip
解压缩:
unzip phpMyAdmin-4.8.5-all-languages.zip
为了尽可能防止 phpMyAdmin 被恶意破解, 可以把解压得到的 phpMyAdmin 默认的文件名改成一个随机的名称:
mv phpMyAdmin-4.8.5-all-languages sofdfdlrbvswskdscdf
之后复制 phpMyAdmin 提供的示例配置文件为我们自己的配置文件:
cd sofdfdlrbvswskdscdf
cp -p config.sample.inc.php config.inc.php
之后可以在浏览器中使用 IP/sofdfdlrbvswskdscdf 或者 域名/sofdfdlrbvswskdscdf 打开 phpMyAdmin 的登陆界面并使用 MySQL 的用户名和密码登陆.
这个报错直接翻译过来就是:”配置文件现在需要一个机密口令 (blowfish_secret)”.
出现这个报错是因为 phpMyAdmin 使用了 blowfish 加密算法对 CCOKIE 进行认证, 因此用户必须给定一个随机字符串用于认证.
解决步骤:
在 phpMyAdmin 的根目录下打开配置文件:
vim config.inc.php
可以看到:
$cfg['blowfish_secret'] = ''; /* YOU MUST FILL IN THIS FOR COOKIE AUTH! */
我们填入一些随机字符, 可以包含大小写字母, 数字和特殊字符, 例如:
$cfg['blowfish_secret'] = 'h2s#AjfF%f*AdSk$w';
这些随机字符串要足够长, 至少需要 32 位, 否则会报如下错误(上面示例中的随机字符串不够长):
The secret passphrase in configuration (blowfish_secret) is too short.
完成上述操作并保存退出之后, 重新登陆 phpMyAdmin 即可发现该报错已消失.
这个报错翻译过来就是:”无法获取 $cfg‘TempDir’. phpMyAdmin 无法缓存模板并将因此变慢”.
解决步骤:
在 phpMyAdmin 的根目录下创建一个 tmp 文件并修改其所属用户和组即可, 命令:
mkdir tmp
chown -R apache:root tmp/
之后, 刷新 phpMyAdmin 的 Web 界面, 该报错即消失.
本文所示的方法同样可以用于在 Ubuntu Linux 等其他大部分 Linux 发行版中部署 phpMyAdmin.
I hope you see things that startle you.
I hope you feel things you never felt before.
I hope you meet people with a different point of view.
I hope you live a life you’re proud of.
If you find that you’re not, I hope you have the strength to start all over again.
Jack: Listen, Rose. You’re gonna get out of here, you’re gonna go on, and you’re gonna make a lots of babies, and you’re gonna watch them grow. You’re gonna die and old…an old lady warm in her bed, not here, not this night. Not like this. do you understand me?
You are the books you read, the films you watch, the music you listen to, the people you meet, the dreams you have, and the conversations you engage in. You are what you take from these.
You are the sound of the ocean, the breath of fresh air, the brightest light and the darkest corner.
You are every single day.
If you think you are beaten, you are.
If you think you dare not, you don’t.
If you want to win, but think you can’t, it’s almost a cinch you won’t.
If you think you’ll lose, you’re lost; for out in the world we find success begins with a fellow’s will. It’s all in the state of the mind.
Life’s battles don’t always go to the stronger and faster man.
But sooner or later the man who wins is the man who thinks he can.
“Just that,” said the fox. “To me, you are still nothing more than a little boy who is just like a hundred thousand other little boys. And I have no need of you. And you, on your part, have no need of me. To you, I am nothing more than a fox like a hundred thousand other foxes. But if you tame me, then we shall need each other. To me, you will be unique in all the world. To you, I shall be unique in all the world…”
Ubuntu 版本: Ubuntu 18.04.1 LTS
OwnCloud 版本: 10.0.10
OwnCloud建议的内存只需要512M, 为了保证系统的可靠运行, 建议使用系统内存为 1GB 及以上的服务器.
10.0.10版的OwnCloud的下载地址如下: https://download.owncloud.org/community/owncloud-10.0.10.tar.bz2
当前的最新版下载地址,可以在OwnCloud的官网下载页面找到:
https://owncloud.org/download/
sudo apt-get install -y apache2
sudo apt-get install -y mariadb-server
新安装的 mysql 数据库的 root 用户的密码默认为空,我们可以使用如下命令为数据库root用户设置密码:
sudo mysqladmin -u root password 密码
设置好之后,登录mysql:
sudo mysql -u root -p
登陆之后,创建一个数据库owncloud:
MariaDB [(none)]> create database owncloud;
创建一个数据库用户 owncloud 并设置密码和权限:
MariaDB [(none)]> grant all on owncloud.* to 'owncloud'@'localhost' identified by '密码';
MariaDB [(none)]> flush privileges;
“flush privileges”用于更新权限.
sudo apt-get install -y php7.0
PHP 7 安装完成后,使用如下命令验证一下 PHP 环境是否配置成功:
php -v
回显如下:
PHP 7.2.10-0ubuntu0.18.04.1 (cli) (built: Sep 13 2018 13:45:02) ( NTS )<br>Copyright (c) 1997-2018 The PHP Group<br>Zend Engine v3.2.0, Copyright (c) 1998-2018 Zend Technologies<br>• with Zend OPcache v7.2.10-0ubuntu0.18.04.1, Copyright (c) 1999-2018, by Zend Technologies
这说明 PHP 环境已经配置成功了。
为了让 Apache2 能够识别 PHP 文件(如果 Apache2 不能识别 PHP 文件,那么当我们通过浏览器访问一个 .php 格式的文件时,浏览器会下载该文件而不是显示该文件)
首先搜索一下有没有相关插件:
apt-cache search libapache2-mod-php
回显如下:
libapache2-mod-php - server-side, HTML-embedded scripting language (Apache 2 module) (default)
libapache2-mod-php7.2 - server-side, HTML-embedded scripting language (Apache 2 module)
php7.2-fpm - server-side, HTML-embedded scripting language (FPM-CGI binary)
根据提示,安装 libapache2-mod-php7.2 这个插件:
sudo apt-get install libapache2-mod-php7.2
为了验证上述插件安装及运行正确,我们可以进行一个测试。
进入 Apache2 服务器的根目录:
cd /var/www/html/
新建一个 .php 文件:
sudo vim 1.php
写入如下内容:
<?php
    phpinfo();
?>
确保 Apache2 服务器正在运行:
systemctl status apache2
之后,就在浏览器中访问该 PHP 文件,看到如下界面就证明 Apache2 服务器可以正常识别并解析 PHP 格式的文件:
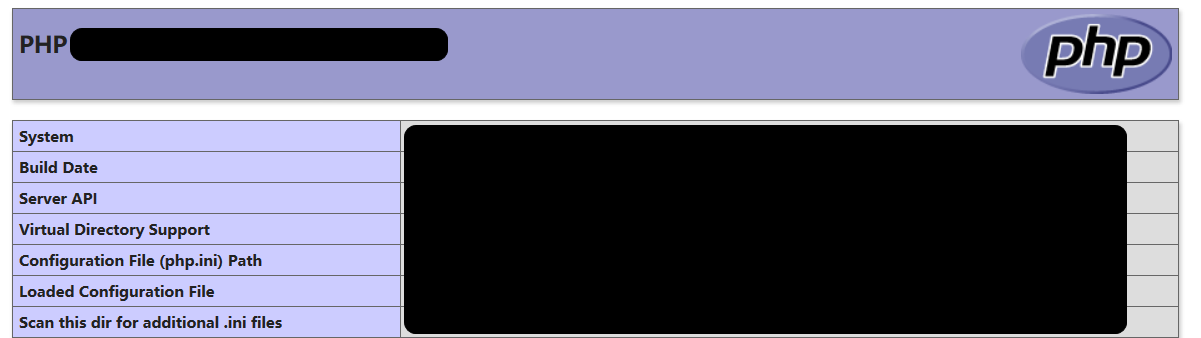
警告:验证完毕后务必删除该文件,否则将可能泄露系统信息。
安装 PHP 的 zip 模块:
sudo apt-get install -y php7.2-zip
安装 PHP 的 intl 模块:
sudo apt-get install -y php7.2-intl
安装 PHP 的 XML 模块:
sudo apt-get install -y php7.2-xml
安装 PHP 的 cURL 模块:
sudo apt-get install -y php7.2-curl
安装 PHP 的 GD 模块:
sudo apt-get install -y php7.2-gd
安装 PHP 的 mbstring 模块:
sudo apt-get install -y php7.2-mbstring
安装 PHP 的 MySQL 模块:
sudo apt-get install -y php7.2-mysql
下载OwnCloud服务器端安装文件:
wget https://download.owncloud.org/community/owncloud-10.0.10.tar.bz2
下载对应的hash256验证文件:
wget https://download.owncloud.org/community/owncloud-10.0.10.tar.bz2.sha256
验证安装文件是否完整
将上面下载下来的两个文件放在同一路径下,验证安装文件是否完整:
sha256sum -c owncloud-10.0.10.tar.bz2.sha256 <owncloud-10.0.10.tar.bz2
如果文件没有问题,则会返回OK:
owncloud-10.0.10.tar.bz2: OK
解压安装包, 命令:
tar -xjf owncloud-10.0.10.tar.bz2
成功解压后会得到一个名为owncloud的文件夹。
复制安装文件到指定目录:
sudo cp -r owncloud /var/www/html
在Apache服务器目录下创建OwnCloud的配置文件:
cd /etc/apache2/sites-available/
sudo touch owncloud.conf
sudo vim owncloud.conf
写入如下配置:
Alias /owncloud "/var/www/html/owncloud/"

<Directory /var/www/html/owncloud/>
  Options +FollowSymlinks
  AllowOverride All

 <IfModule mod_dav.c>
  Dav off
 </IfModule>

 SetEnv HOME /var/www/html/owncloud
 SetEnv HTTP_HOME /var/www/html/owncloud

</Directory>
接下来创建一个symlink:
sudo ln -s /etc/apache2/sites-available/owncloud.conf /etc/apache2/sites-enabled/owncloud.conf
更改 owncloud 目录所属的用户和用户组:
sudo chown -R www-data:www-data /var/www/html/owncloud/
重启Apache:
sudo systemctl restart apache2
输入Your Server IP/owncloud/ 就看到OwnCloud的安装界面了:

创建管理员的用户名和密码:
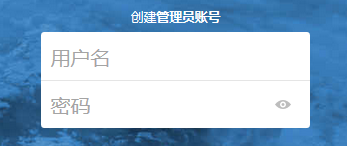
配置存储路径和数据库:
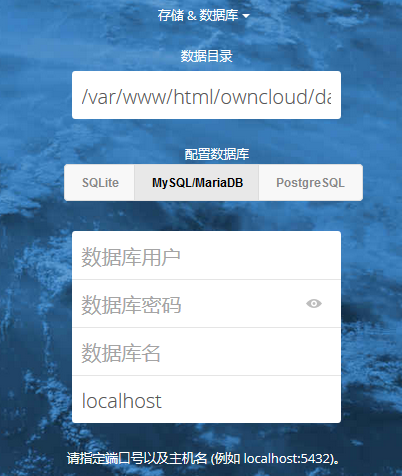
安装完成后就可以使用管理员账户登录了:
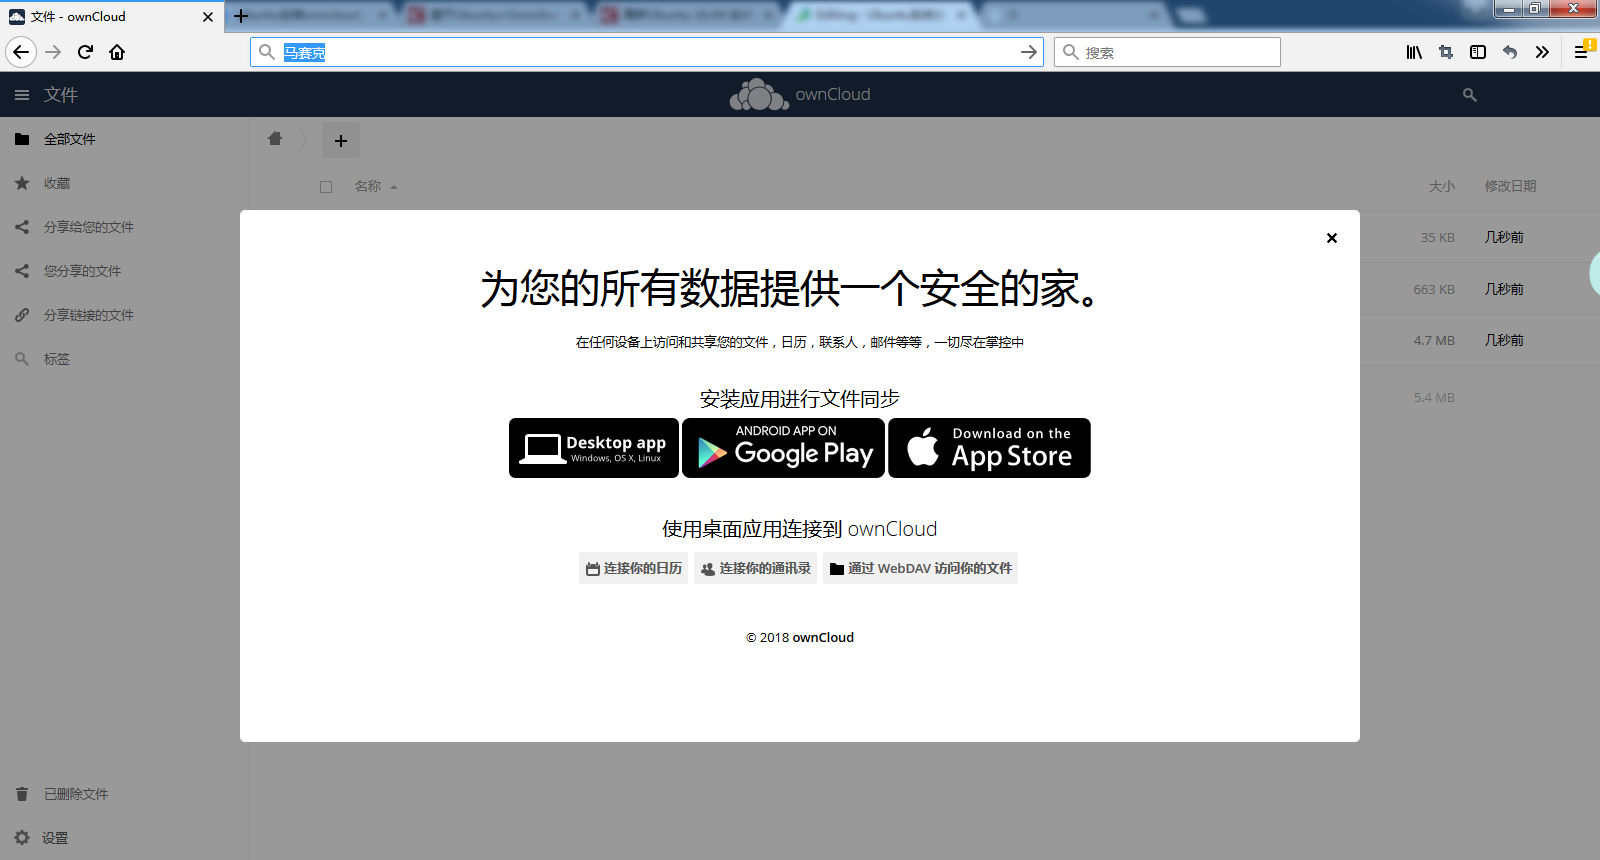
直接使用管理员账户登录是有风险的,我们可以创建一个非管理员账户,加入非Admin组。创建用户时输入用户名,用户邮箱和用户所有的组即可以创建一个用户:

创建完成后的用户是没有设置自定义密码的,在该用户对应的“密码”一栏可以更改用户密码:
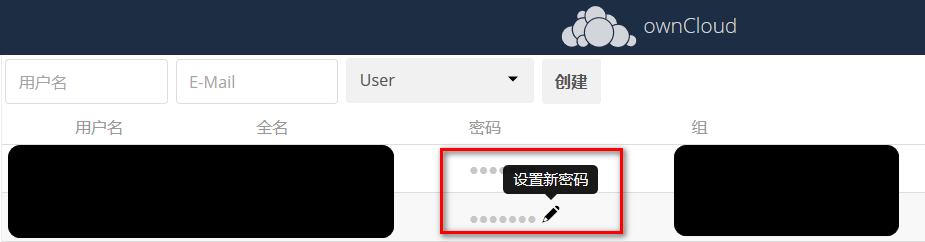
输入新密码后回车即可以看到密码修改成功的提示:

至此, 私有云存储服务器端的基础配置基本完成.
OwnCloud官网提供的安装手册: https://doc.owncloud.org/server/latest/admin_manual/installation/
星系炸弹
在X星系的广袤空间中漂浮着许多X星人造“炸弹”,用来作为宇宙中的路标。 每个炸弹都可以设定多少天之后爆炸。 比如:阿尔法炸弹2015年1月1日放置,定时为15天,则它在2015年1月16日爆炸。 有一个贝塔炸弹,2014年11月9日放置,定时为1000天,请你计算它爆炸的准确日期。
请填写该日期,格式为 yyyy-mm-dd 即4位年份2位月份2位日期。比如:2015-02-19 请严格按照格式书写。不能出现其它文字或符号。
本题用 Excel 或者用程序计算都可以 (用 Excel 计算的方法本文不做过多介绍).
这里需要注意的就是闰年和非闰年以及大月小月和 2 月, 闰年的 2 月有 29 天, 非闰年的 2 月有 28 天, 因此, 闰年有 366 天, 非闰年有 365 天.
另外, 根据示例, 放置炸弹的那天按第 0 天计算.
本题正确答案是:
2017-08-05
程序:
#include<iostream>
#include<bits/stdc++.h>
using namespace std;
int main(){
	int sum=1000;
	int Mdays[12]={31,28,31,30,31,30,31,31,30,31,30,31};
	int Y=2014;
	int M=11;
	int D=9;

//2014 年 11 月 09 日距离爆炸有 1000 天, 在此循环 1000 次
	for(int i=1;i<=sum;i++){
		D++; //每循环一次则日数加 1
		if(D>Mdays[M-1]){ //如果日数大于 11 月的日数, 则日数重置为 1, 月数加 1
			D=1;
			M++;
			if(M>12){ //如果月数大于 12, 则月数重置为 1, 年数加 1.
				M=1;
				Y++;

				//新开始一年之后, 对是否为闰年进行判断
				if((Y%400==0)||(Y%4==0&&Y%100!=0)){
					Mdays[1]=29;
				}else{
					Mdays[1]=28;
				}
			}
		}
	}
	cout<<Y<<"-"<<M<<"-"<<D<<endl;
	return 0;
}
No matter who you are, how experienced you are, or how knowledgeable you think you are, don’t pass judgment without giving others the chance to explain themselves first.
What you first see, may not be the reality.
Never conclude for others.
Everyone single person on the planet has a story. Don’t judge people before you truly know them. The truth might surprise you.
Many times in our lives, we are dropped, crumpled, and ground into the dirt by the decisions we make and the circumstances that come our way.
We feel as through we are worthless, but no matter what happened or what will happen, you will never lose you value.
Dirty or clean, crumpled or finely creased, you are still priceless to those who love you.
The worth of our lives comes, not in what we do or what we know, but in who we are.
You are special, don’t ever forget it.
I hate it when you make me laugh,
Even worse when you make me cry.
But mostly I hate the way I don’t hate you.
If you lose your way, your forever friend guides you and cheers you in.
Your forever friend holds your hand and tells you what everything is going to be okay.
And if you find such a friend, you feel happy and complete because you need not worry.
You have a forever friend, and forever has no end.
For all the nights that I’ve sat up with you, doctored you and prayed for you, no charge.
For all the trying times, and all the tears that you’ve caused through the years, there’s no charge.
And when you add it all up, the pull cost of real love is no charge.
If you want more love in the world, create more love in your heart. If you want more competence in your team, improve your competence.
This relationship applies to everything, in all aspects of life. Life will give you back everything you have given to it.
Your life is not a coincidence, It’s a reflection of you!
Everyone focused on the black dot – and the same thing happens in our lives.
However, we insist on focusing only on the black dot – the health issues that bother us, the lack of money, the complicated relationship with a family member, the disappointment with a friend.
The dark spots are very small when compared to everything we have in our lives, but they are the ones that pollute our minds.
Take your eyes away from the black dots in your lives.
Enjoy each one of your blessings, each moment that life gives you.
When you thought I wasn’t looking, I saw tears come from your eyes and I learned that sometimes things hurt, but it’s alright to cry.
When you thought I wasn’t looking, I learned most of life’s lessons that I need to know to be a good person when I grow up.
When you thought I wasn’t looking, I looked at you and wanted to say,”Thanks for all the things I saw when you thought I wasn’t looking.”
Knowledge smiled with deep wisdom and answered, “Because only Time is capable of understanding how valuable Love is.”
A word that means the world to me.
奖券数目
有些人很迷信数字,比如带“4”的数字,认为和“死”谐音,就觉得不吉利。 虽然这些说法纯属无稽之谈,但有时还要迎合大众的需求。某抽奖活动的奖券号码是5位数(10000-99999),要求其中不要出现带“4”的号码,主办单位请你计算一下,如果任何两张奖券不重号,最多可发出奖券多少张。
请提交该数字(一个整数),不要写任何多余的内容或说明性文字。
本题的主要解题思路就是枚举 10000-99999 之间的所有数字, 然后判断其中是否含有 4 , 如果不含有 4 则计数器加 1.
在具体实现上, 有四种解法. 第一种解法是对每个枚举结果都进行分解, 将原来的 5 位数分解成 5 个 1 位数, 之后逐个数字判断是否含有数字 4; 第二种方法是把每个枚举的结果都转换成字符串, 之后判断这个字符串中是否包含字符”4″, 如果不包含则计数器加 1; 第三种解法是使用 5 个 for 循环, 模拟奖券的五位数, 之后进行枚举和判断; 第四种解法是使用数学方法求解. 由于除了数字 4 之外, 一共有 9 个数字可以使用, 而且最高位不能为 0, 那么可以计算出符合条件的个数为:
8*9*9*9*9=52488
本题的正确答案是:
52488
下面针对上述分析, 分别求解如下.
将 10000-99999 之间的所有 5 位数都逐个分解成 5 个 1 位数, 之后逐个数字判断是否为数字 4.
程序:
#include<iostream>
using namespace std;
int main(){
	int ans = 0;
	for(int i=10000;i<=99999;i++){

		//将每一位上的数字都分离出来
		//(i%1000) 取余将去掉当前最高位后形成新的数字
		//(i%10000)-(i%1000) 将把当前最高位之后的数字都变成 0
		//((i%10000)-(i%1000))/1000 将去掉最高位后面的 0, 形成一个个位数
		int a = (i-(i%10000))/10000;
		int b = ((i%10000)-(i%1000))/1000;
		int c = ((i%1000)-(i%100))/100;
		int d = ((i%100)-(i%10))/10;
		int e = (i%10);

		//如果每个位上的数字都不是 4 则计数器加 1
		if(a!=4&&b!=4&&c!=4&&d!=4&&e!=4){
			ans++;
		}
	}
	cout<<ans<<endl;
	return 0;
}
把 10000-99999 之间的每个枚举的结果都转换成字符串, 之后判断这个字符串中是否包含字符”4″.
程序:
#include<iostream>
#include<bits/stdc++.h>
using namespace std;
void i2s(int num, string &str){
//stringstream 类的作用是将数字转换成字符串
		stringstream ss;

//将需要转换的数字 sum 使用 << 运算符传递给 ss 对象
		ss << num;

//将转换后的字符串使用 >> 运算符传递给 str 变量
		ss >> str;
	}
int main(){
	int ans=0;
	for(int i=10000;i<=99999;i++){
		string s;
		i2s(i,s);

//查找字符串 s 中是否不包含(注意: 不包含用的是 ==)'4'这个字符串
		if(s.find('4')==string::npos){
			ans++;
		}
	}
	cout<<ans<<endl;
	return 0;
}
使用 5 个 for 循环, 模拟奖券的五位数, 之后进行枚举和判断. 程序:
#include<iostream>
#include<bits/stdc++.h>
using namespace std;
int main(){
	int ans=0;
	for(int a=1;a<=9;a++){
		if(a!=4){
			for(int b=0;b<=9;b++){
				if(b!=4){
					for(int c=0;c<=9;c++){
						if(c!=4){
							for(int d=0;d<=9;d++){
								if(d!=4){
									for(int e=0;e<=9;e++){
										if(e!=4){
											ans++;
										}
									}
								}
							}
						}
					}
				}
			}
		}

	}
	cout<<ans<<endl;
	return 0;
}
由于除了数字 4 之外, 一共有 9 个数字可以使用, 而且最高位不能为 0, 那么可以计算出符合条件的奖券个数为:
8*9*9*9*9=52488
格子中输出
StringInGrid函数会在一个指定大小的格子中打印指定的字符串。 要求字符串在水平、垂直两个方向上都居中。 如果字符串太长,就截断。 如果不能恰好居中,可以稍稍偏左或者偏上一点。
下面的程序实现这个逻辑,请填写划线部分缺少的代码。
#include <stdio.h>
#include <string.h>

void StringInGrid(int width, int height, const char* s)
{
	int i,k;
	char buf[1000];
	strcpy(buf, s);
	if(strlen(s)>width-2) buf[width-2]=0;


```
printf("+");
for(i=0;i<width-2;i++) printf("-");
printf("+\n");

for(k=1; k<(height-1)/2;k++){
	printf("|");
	for(i=0;i<width-2;i++) printf(" ");
	printf("|\n");
}

printf("|");

printf("%*s%s%*s",_____________________________________________);  //填空

printf("|\n");

for(k=(height-1)/2+1; k<height-1; k++){
	printf("|");
	for(i=0;i<width-2;i++) printf(" ");
	printf("|\n");
}

printf("+");
for(i=0;i<width-2;i++) printf("-");
printf("+\n");
```

}

int main()
{
	StringInGrid(20,6,"abcd1234");
	return 0;
}
对于题目中数据,应该输出:
+------------------+
|                  |
|     abcd1234     |
|                  |
|                  |
+------------------+
(如果出现对齐问题,参看【图1.jpg】)
注意:只填写缺少的内容,不要书写任何题面已有代码或说明性文字。
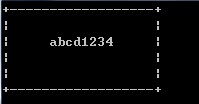
对于代码填空题, 我们不需要读完全部代码, 只需要知道需要填空的地方完成的是什么样的功能即可.
首先, 我们可以先把需要填空的地方注释掉, 看看没有这一句代码的话程序的执行结果是怎样的(如果缺少该句代码之后程序可以执行的话). 在本题中注释掉需要填空的代码之后, 运行结果如图 2 所示:
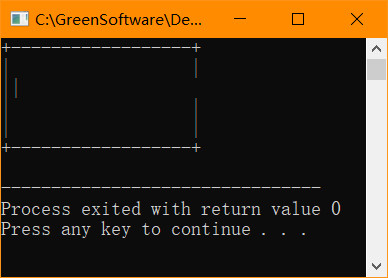
根据显示的结果可以看出, 缺少的代码就是用来打印格子中的字符串和用于对齐的空格的.
本题考查的是 C++ 中的 printf() 函数的 * , 在 C++ 的官网上可以查找到相关的 API. 在 C++ 官网搜索 printf 即可打开关于 printf() 函数的 API 说明文档 (蓝桥杯比赛的计算机上也提供有 C/C++ 的 API 说明文档), 地址如下:
http://www.cplusplus.com/reference/cstdio/printf/?kw=printf
从官网上我们可以找到这样一个说明, 如图 3:

在其下的示例中我们可以看到对 * 用法的演示 (如图 4):
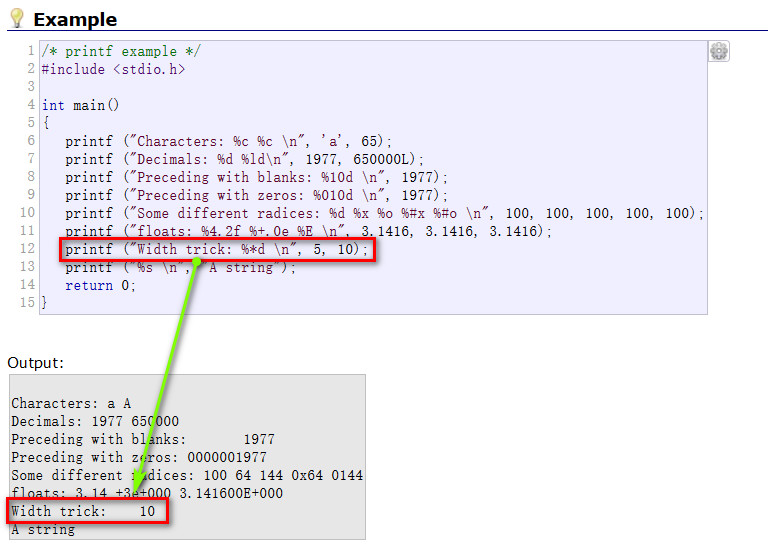
题目中用到的是 %*s , 这里用到的是 %*d, 根据之前学习到的 printf() 函数中 %d 表示整型变量, %s 表示字符型变量的知识可以推测, %*d 和 %*s 也是分别对应整型变量和字符型变量的. 为了验证, 我们可以写这样一段程序:
#include<stdio.h>
int main(){
	printf("%*d",3, 9);
	printf("\n");
	printf("%*s",6, "aa");
	return 0;
}
运行结果如下:
  9
    aa
从输出结果可以发现, 第一行打印出了 2 个空格和 1 个数字 (2+1=3), 第二行打印出了 4 个空格和 2 个字符 (4+2=6).
由此可以看到, printf() 函数中的 * 是用来确定输出的”宽度”的, 需要向其传送两个变量, 一个是宽度值, 一个是要打印的变量, 当要打印的变量的长度小于宽度值时就用空格填充.
再来看需要填空的那行代码:
printf("%*s%s%*s",_____________________________________________);
关键之处是 %*s%s%*s . 根据上面的分析我们知道, 其中间的 %s 是用来打印字符串的, 两边的 %*s 是用来打印空格的. 由于需要对齐, 所以需要知道每行的总长度和字符串的长度才可以计算出要打印的空格的个数.
根据题目中的下面这些代码可以知道每行的长度为 width:
printf("+");
for(i=0;i<width-2;i++) printf("-");
printf("+\n");
由下面这行代码可以确定字符串变量 s 被复制给了变量 buf :
strcpy(buf, s);
strcpy() 函数的功能为:
复制字符串from 中的字符到字符串to,包括空值结束符。返回值为指针to。
来自 C/C++ API 文档
由下面这行代码可以知道字符串变量 s 的长度为 strlen(s) :
if(strlen(s)>width-2) buf[width-2]=0;
由于题目中有如下的说明:
如果不能恰好居中,可以稍稍偏左或者偏上一点。
因此, 当行长度为 20, 字符长度为 8 的时候, 左边的空格应该有 (20-8-2)/2=5 个, 右边的空格应该有 (20-8-2)/2=(20-8-1)/2=5 个. 如果行长度为 21, 字符长度为 8 的时候, 左边的空格应该有 (21-8-2)/2=5 个, 右边的空格应该有 (21-8-1)/2=6 个
由此可以确定, 字符串变量 s 的左边需要打印的空格数为:
(width-strlen(s)-2)/2
右边应该打印的空格数为:
(width-strlen(s)-1)/2
因此空格中应该填写的内容是:
width-2-strlen(s))/2," ",buf,(width-strlen(s)-1)/2," "
完整的程序代码如下:
#include <stdio.h>
#include <string.h>

void StringInGrid(int width, int height, const char* s)
{
	int i,k;
	char buf[1000];
	strcpy(buf, s);
	if(strlen(s)>width-2) buf[width-2]=0;


printf("+");
for(i=0;i<width-2;i++) printf("-");
printf("+\n");

for(k=1; k<(height-1)/2;k++){
	printf("|");
	for(i=0;i<width-2;i++) printf(" ");
	printf("|\n");
}

printf("|");

printf("%*s%s%*s",(width-2-strlen(s))/2," ",buf,(width-strlen(s)-1)/2," ");  //填空

printf("|\n");

for(k=(height-1)/2+1; k<height-1; k++){
	printf("|");
	for(i=0;i<width-2;i++) printf(" ");
	printf("|\n");
}

printf("+");
for(i=0;i<width-2;i++) printf("-");
printf("+\n");

}

int main()
{
	StringInGrid(20,6,"abcd1234");
	return 0;
}
Today is the first anniversary of Hawking’s death.
A year ago today, Hawking had to leave us forever, a great scientific craftsman sleeps forever.
Hawking left, but his mind was immortalized. It was he who took us hundreds of millions of light-years away to appreciate the mystery there, he made us realize the eternity of time and the vastness of space, he taught us that humans are born small, but can achieve greatness.
Salute to the greatness and Hawking!
荒原之梦原来使用的代码高亮插件的作者已经很久没有更新该插件了, 在我将 WordPress 的版本升级到新版本后之后, WordPress 的默认编辑器变成了”区块编辑器”, 而原来的代码高亮插件对该编辑器的适配不够理想, 经常发生把代码中的一些字符进行 HTML 转义后再显示的情况.
综合以上情况, 遂于昨日决定更换荒原之梦的代码高亮插件. 不过更换插件之后, 使用原来插件写入的代码都失去了高亮样式. 由于不知道怎么才能批量转换, 让原来的代码也使用现在的高亮插件显示, 于是, 我就手动一篇篇文章重新使用现在的高亮插件写入一遍代码, 使得原来的代码也可以高亮显示.
由于手动修改难免有纰漏, 如果大家发现有文章中的代码没有高亮显示, 请联系我, 联系方式在右边侧栏.
三羊献瑞
观察下面的加法算式:
      祥 瑞 生 辉
  +   三 羊 献 瑞
-------------------
   三 羊 生 瑞 气
(如果有对齐问题,可以参看【图1.jpg】)
其中,相同的汉字代表相同的数字,不同的汉字代表不同的数字。
请你填写“三羊献瑞”所代表的4位数字(答案唯一),不要填写任何多余内容。
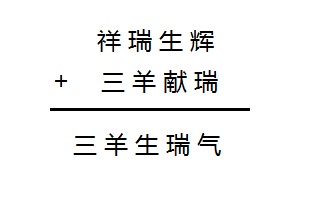
将这八个汉字分别用字母 a~h 和数组 aa[0]~aa[7] 对应表示如下:
三 -> a -> aa[0]
羊 -> b -> aa[1]
献 -> c -> aa[2]
瑞 -> d -> aa[3]
祥 -> e -> aa[4]
生 -> f -> aa[5]
辉 -> g -> aa[6]
气 -> h -> aa[7]
换算成题目中的形式分别是:
      e d f g
  +   a b c d
-------------------
    a b f d h
和
      aa[4] aa[3] aa[5] aa[6]
  +   aa[0] aa[1] aa[2] aa[3]
-------------------------------
aa[0] aa[1] aa[5] aa[3] aa[7]
这里之所以要分别使用字母和数组表示一个汉字是因为下面提到的三种方法要用到.
本题的要求可以总结如下:
这个解法基于 C++ 标准函数库 STL 中的 next_permutation() 全排列函数进行. 对 0~9 十个数字进行全排列, 取每次排列的前 8 个代入公式进行计算并检验是否满足要求. 由于进行的是全排列, 所以数组 aa[] 的前 8 个元素都有机会包含 0~9 这 10 个数字.
代码如下:
#include<iostream>
#include<bits/stdc++.h>
using namespace std;
int main(){
	int aa[10]={0,1,2,3,4,5,6,7,8,9};
	int sum=0;
	int sum1=0;
	int sum2=0;
	int ans=0;
	while(next_permutation(aa,aa+10)){
		if(aa[0]!=0&&aa[4]!=0){
			sum1=aa[4]*1000+aa[3]*100+aa[5]*10+aa[6];
			sum2=aa[0]*1000+aa[1]*100+aa[2]*10+aa[3];
			sum=aa[0]*10000+aa[1]*1000+aa[5]*100+aa[3]*10+aa[7];
			if(sum==(sum1+sum2)){
			break;
			}
		}


	}
	cout<<"祥瑞生辉:"<<endl;
	cout<<" "<<sum1<<endl;

	cout<<"三羊献瑞:"<<endl;
	cout<<" "<<sum2<<endl;

	cout<<"三羊生瑞气:"<<endl;
	cout<<sum<<endl;
	return 0;
}
正确答案:
1085
这个解法的思路和解法一类似, 只不过不使用 STL 提供的 next_permutation() 全排列函数, 而改用 8 个 for 循环进行暴力破解.
代码如下:
#include<iostream>
#include<bits/stdc++.h>
using namespace std;
int main(){
	int sum, sum1, sum2;
	for(int a=1;a<=9;a++){ //a 不能等于 0
		for(int b=0;b<=9;b++){
			if(b!=a){
				for(int c=0;c<=9;c++){
					if(c!=a&&c!=b){
						for(int d=0;d<=9;d++){
							if(d!=a&&d!=b&&d!=c){
								for(int e=1;e<=9;e++){ //e 不能等于 0
									if(e!=a&&e!=b&&e!=c&&e!=d){
										for(int f=0;f<=9;f++){
											if(f!=a&&f!=b&&f!=c&&f!=d&&f!=e){
												for(int g=0;g<=9;g++){
													if(g!=a&&g!=b&&g!=c&&g!=d&&g!=e&&g!=f){
														for(int h=0;h<=9;h++){
															if(h!=a&&h!=b&&h!=c&&h!=d&&h!=e&&h!=f&&h!=g){
																sum1=e*1000+d*100+f*10+g;
																sum2=a*1000+b*100+c*10+d;
																sum=a*10000+b*1000+f*100+d*10+h;
																if(sum==(sum1+sum2)){
																	printf("%d\n",sum2);
																}
															}

														}
													}
												}
											}
										}
									}
								}
							}
						}
					}
				}
			}
		}
	}
	return 0;
}
正确答案:
1085
为了进一步验证结果的正确性, 也可以将 8 个汉字对应的结果都输出数来. 由于解法一中已经这么做, 这里就不再加入输出全部计算结果的代码. 输出全部计算结果后需要注意的是, 看清题意和计算结果, 不要误提交不符合题目要求的答案
这个解法用到了一些数学原理, 可以减少 for 循环的个数, 能够提高计算效率. 虽然对于填空题而言没必要考虑计算效率的问题, 但是这也是一种计算方式, 有必要尝试一下.
首先, 我们看一下这个式子:
      e d f g
  +   a b c d
-------------------
    a b f d h
两个四位数相加得出了一个五位数, 根据加法中”满十进一”的法则, 五位数的最高位一定是 1, 即:
a=1
于是, 原式就变成了:
      e d f g
  +   1 b c d
-------------------
    1 b f d h
这样我们就可以去掉对 a 的 for 循环, 对解法二中的代码进行一下修改即可.
代码如下:
#include<iostream>
#include<bits/stdc++.h>
using namespace std;
int main(){
	int sum, sum1, sum2;
	int a=1;
		for(int b=0;b<=9;b++){
			if(b!=a){
				for(int c=0;c<=9;c++){
					if(c!=a&&c!=b){
						for(int d=0;d<=9;d++){
							if(d!=a&&d!=b&&d!=c){
								for(int e=1;e<=9;e++){ //e 不能等于 0
									if(e!=a&&e!=b&&e!=c&&e!=d){
										for(int f=0;f<=9;f++){
											if(f!=a&&f!=b&&f!=c&&f!=d&&f!=e){
												for(int g=0;g<=9;g++){
													if(g!=a&&g!=b&&g!=c&&g!=d&&g!=e&&g!=f){
														for(int h=0;h<=9;h++){
															if(h!=a&&h!=b&&h!=c&&h!=d&&h!=e&&h!=f&&h!=g){
																sum1=e*1000+d*100+f*10+g;
																sum2=a*1000+b*100+c*10+d;
																sum=a*10000+b*1000+f*100+d*10+h;
																if(sum==(sum1+sum2)){
																	printf("%d\n",sum2);
																}
															}

														}
													}
												}
											}
										}
									}
								}
							}
						}
					}
				}
			}
		}
	return 0;
}
下面这段代码是错误的:
#include<iostream>
#include<bits/stdc++.h>
using namespace std;
int main(){
	int aa[10]={0,1,2,3,4,5,6,7,8,9};
	int sum=0;
	int sum1=0;
	int sum2=0;
	int ans=0;
	while(next_permutation(aa,aa+10)){
		if(aa[0]!=0&&aa[4]!=0){
			sum1=aa[4]*1000+aa[3]*100+aa[5]*10+aa[6];
			sum2=aa[0]*1000+aa[1]*100+aa[2]*10+aa[3];
			sum=aa[0]*10000+aa[1]*1000+aa[5]*100+aa[3]*10;
			if(sum==(sum1+sum2)){
			break;
			}
		}
	}
	cout<<sum1<<endl;
	cout<<sum2<<endl;
	cout<<sum<<endl;
	return 0;
}
运行结果是:
9347
1083
10430
由运行结果可以看到, 最后计算的和为”10430″, 出现了重复的 “0”, 而在题目中的结果里 “三 羊 生 瑞 气” 并没有重复的汉字, 因此这个结果是错误的, 原因在下面这段代码:
sum=aa[0]*10000+aa[1]*1000+aa[5]*100+aa[3]*10;
上面这段代码中没有加入个位, 因此导致错误.
在做题时要注意以下三点:
[root@localhost ~]# cat /etc/redhat-release CentOS Linux release 7.5.1804 (Core)继续阅读“解决 CentOS 7 报错: Cannot find a valid baseurl for repo extras7x86_64”
假设我们要编写的 C 语言源代码文件的文件名称是 a.c
则,在 gcc 下指定编译器编译标准的命令为:
gcc -std=c99 a.c //调用 C99 标准
gcc -std=c1x a.c //调用 GCC 接受 C11 之前的草案标准
gcc -std=c11 a.c //调用 C11 标准
clang 编译器与 gcc 编译器用法相同, 如果要使用 clang 编译器, 则将 gcc 替换成 clang 即可.
如果想查看当前使用的 gcc 编译器默认的编译标准, 在 Ubuntu Linux 中可以使用如下命令查看 C 语言的所有预编译宏:
gcc -E -dM - </dev/null在输出的结果中查看 #define __STDC_VERSION__ 的值, 不同值代表的不同编译标准如下:
#define __STDC_VERSION__ 199901L //C99 标准 #define __STDC_VERSION__ 201112L //C11 标准继续阅读“在 Linux 下的 gcc 或 clang 编译器中调用不同版本的 C 语言标准编译程序以及查看本机默认编译标准的方法”
Windows 10 中文家庭版 64 位
(需要 Windows 10 16215.0 或更高版本的 Windows 10 才可以)
WSL 全称为 Windows Subsystem for Linux (Windows 下的 Linux 子系统). Wikipedia 对 WSL 的描述摘录如下 (Source: HERE)
适用于 Linux 的 Windows 子系统(英语:Windows Subsystem for Linux,简称WSL)是一个为在Windows 10和Windows Server 2019上能够原生运行Linux二进制可执行文件(ELF格式)的兼容层。
来自维基百科词条: 适用于 Linux 的 Windows 子系统
WSL提供了一个由微软开发的Linux兼容的内核接口(不包含Linux内核代码),然后可以在其上运行GNU用户空间,例如Ubuntu,openSUSE,SUSE Linux Enterprise Server,Debian和Kali Linux。这样的用户空间可能包含Bash shell和命令语言,使用本机GNU/Linux命令行工具(sed,awk等),编程语言解释器(Ruby,Python等),甚至是图形应用程序(使用主机端的X窗口系统)。
由于 Windows 下的 Linux 子系统并不包含 Linux 内核, 所以这严格上讲并不是一个真正的 Linux 系统, 但是对终端用户而言, 使用感受上是和真正的 Linux 系统很接近的. 使用 Linux 子系统既避免了在一台计算机上使用双系统时同一时间内只能运行其中一个的问题, 也避免了使用虚拟机时系统资源的大量消耗, 如果喜欢使用 Linux 命令的话, Linux 子系统还是值得一试的.
继续阅读“在 Windows 10 上使用 WSL 配置和运行 Kali Linux / Ubuntu Linux”