一、操作环境
操作系统:Windows 10 家庭版 64位
模拟器软件:GNS3 2.1.11
模拟路由器型号:c7200
二、实验环境构建
按照如下拓扑图连接4台路由器并为其配置 IP 地址:
![图 0 IP协议分析实验拓扑图](https://documents.zhaokaifeng.com/uploads/2018/10/17/ddf499ea12583db1a0952e1493893fc90d1a7db5d18ab7de10a78be92e70fcda.webp)
R1上IP地址的配置命令如下,其他3个路由器的配置过程参考R1上的配置进行:
R1#config terminal
R1(config)#int s1/0
R1(config-if)#ip address 192.34.1.1 255.255.255.0
R1(config-if)#clock rate 64000
R1(config-if)#no shutdown
R1(config-if)#int loopback0
R1(config-if)#ip address 192.34.4.1 255.255.255.0
R1(config-if)#no shutdown
R1(config-if)#end
R1#write
Building configuration...
[OK]
R1#
R1#config terminal R1(config)#int s1/0 R1(config-if)#ip address 192.34.1.1 255.255.255.0 R1(config-if)#clock rate 64000 R1(config-if)#no shutdown R1(config-if)#int loopback0 R1(config-if)#ip address 192.34.4.1 255.255.255.0 R1(config-if)#no shutdown R1(config-if)#end R1#write Building configuration... [OK] R1#
为了避免运行路由协议产生的数据包对本次实验抓取到的数据包造成干扰,所以我们在每台路由器上都配置一个静态路由:
R1上的静态路由配置:
R1(config)#ip route 192.34.2.0 255.255.255.0 192.34.1.2
R1(config)#ip route 192.34.3.0 255.255.255.0 192.34.1.2
R1(config)#ip route 192.34.5.0 255.255.255.0 192.34.1.2
R1(config)#ip route 192.34.2.0 255.255.255.0 192.34.1.2
R1(config)#ip route 192.34.3.0 255.255.255.0 192.34.1.2
R1(config)#ip route 192.34.5.0 255.255.255.0 192.34.1.2
R1(config)#ip route 192.34.2.0 255.255.255.0 192.34.1.2 R1(config)#ip route 192.34.3.0 255.255.255.0 192.34.1.2 R1(config)#ip route 192.34.5.0 255.255.255.0 192.34.1.2
R2上的静态路由配置:
R2(config)#ip route 192.34.3.0 255.255.255.0 192.34.2.2
R2(config)#ip route 192.34.4.0 255.255.255.0 192.34.1.1
R2(config)#ip route 192.34.5.0 255.255.255.0 192.34.2.2
R2(config)#ip route 192.34.3.0 255.255.255.0 192.34.2.2
R2(config)#ip route 192.34.4.0 255.255.255.0 192.34.1.1
R2(config)#ip route 192.34.5.0 255.255.255.0 192.34.2.2
R2(config)#ip route 192.34.3.0 255.255.255.0 192.34.2.2 R2(config)#ip route 192.34.4.0 255.255.255.0 192.34.1.1 R2(config)#ip route 192.34.5.0 255.255.255.0 192.34.2.2
R3上的静态路由配置:
R3(config)#ip route 192.34.1.0 255.255.255.0 192.34.2.1
R3(config)#ip route 192.34.4.0 255.255.255.0 192.34.2.1
R3(config)#ip route 192.34.5.0 255.255.255.0 192.34.3.2
R3(config)#ip route 192.34.1.0 255.255.255.0 192.34.2.1
R3(config)#ip route 192.34.4.0 255.255.255.0 192.34.2.1
R3(config)#ip route 192.34.5.0 255.255.255.0 192.34.3.2
R3(config)#ip route 192.34.1.0 255.255.255.0 192.34.2.1 R3(config)#ip route 192.34.4.0 255.255.255.0 192.34.2.1 R3(config)#ip route 192.34.5.0 255.255.255.0 192.34.3.2
R4上的静态路由配置:
R4(config)#ip route 192.34.1.0 255.255.255.0 192.34.3.1
R4(config)#ip route 192.34.2.0 255.255.255.0 192.34.3.1
R4(config)#ip route 192.34.4.0 255.255.255.0 192.34.3.1
R4(config)#ip route 192.34.1.0 255.255.255.0 192.34.3.1
R4(config)#ip route 192.34.2.0 255.255.255.0 192.34.3.1
R4(config)#ip route 192.34.4.0 255.255.255.0 192.34.3.1
R4(config)#ip route 192.34.1.0 255.255.255.0 192.34.3.1 R4(config)#ip route 192.34.2.0 255.255.255.0 192.34.3.1 R4(config)#ip route 192.34.4.0 255.255.255.0 192.34.3.1
配置完成静态路由之后,全网所有IP地址之间都可以互相ping通。
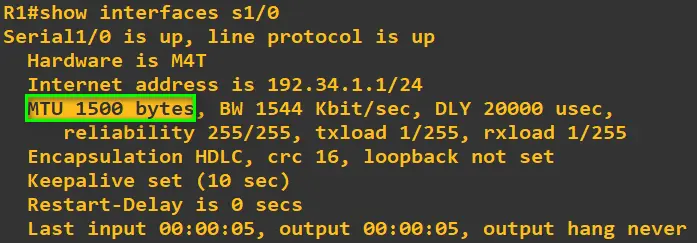
下面需要修改一下路由器各个SeXXXXX接口上的MTU最大传输单元的值。首先查看一下现在MTU值,示例命令:
show interfaces s1/0
我们可以看到s1/0这个接口上目前默认的MTU值是 1500 bytes, 如图:
![图 1 默认MTU值](https://documents.zhaokaifeng.com/uploads/2018/10/17/0c5712426fb7712187509fcd3d37213225babbe1cc3985bb50280e1c0d34be00.webp)
修改接口MTU值的参考命令如下:
R2(config)#interface s1/0
R2(config-if)#ip mtu 1300
R2(config)#interface s1/0
R2(config-if)#ip mtu 1300
R2(config)#interface s1/0 R2(config-if)#ip mtu 1300
按照下表将其余的接口都修改成表中指定的MTU值:
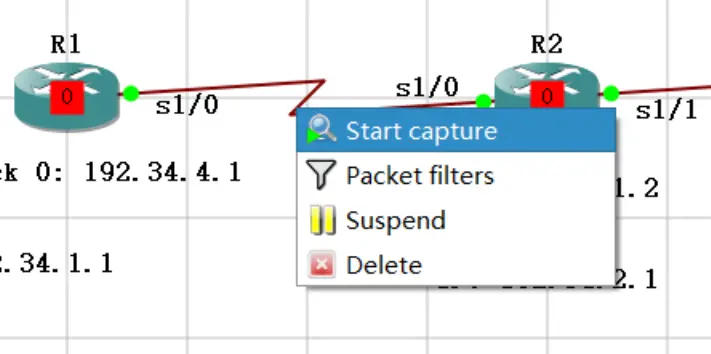
分别在路由器R1的s1/0, R2的s1/1接口, R3的s1/2接口上开启抓包,开启抓包的方法是在相应接口所在的连线上右键点击”Start capture”, 如图:
![图 2 Start capture](https://documents.zhaokaifeng.com/uploads/2018/10/17/9a441add896dea25083b2dbda3de3b28c8f79d492102454e3e9ff9d074e0ddea.webp)
三、数据包抓取
第一次抓包分析: R1向R5发送扩展 Ping 的 ICMP 数据包
使用扩展ping由R1上的192.34.4.1向R5上的192.34.5.1发送扩展ping命令,指定发送一个ICMP数据包,该数据包的长度为1450, 命令如下:
R1#ping
Protocol [ip]:
Target IP address: 192.34.5.1
Repeat count [5]: 1
Datagram size [100]: 1450
Timeout in seconds [2]:
Extended commands [n]: y
Source address or interface: 192.34.4.1
Type of service [0]:
Set DF bit in IP header? [no]:
Validate reply data? [no]:
Data pattern [0xABCD]:
Loose, Strict, Record, Timestamp, Verbose[none]:
Sweep range of sizes [n]:
Type escape sequence to abort.
Sending 1, 1450-byte ICMP Echos to 192.34.5.1, timeout is 2 seconds:
Packet sent with a source address of 192.34.4.1
!
Success rate is 100 percent (1/1), round-trip min/avg/max = 92/92/92 ms
R1#
R1#ping Protocol [ip]: Target IP address: 192.34.5.1 Repeat count [5]: 1 Datagram size [100]: 1450 Timeout in seconds [2]: Extended commands [n]: y Source address or interface: 192.34.4.1 Type of service [0]: Set DF bit in IP header? [no]: Validate reply data? [no]: Data pattern [0xABCD]: Loose, Strict, Record, Timestamp, Verbose[none]: Sweep range of sizes [n]: Type escape sequence to abort. Sending 1, 1450-byte ICMP Echos to 192.34.5.1, timeout is 2 seconds: Packet sent with a source address of 192.34.4.1 ! Success rate is 100 percent (1/1), round-trip min/avg/max = 92/92/92 ms R1#
第一次数据包分析
R1到R2上的数据包